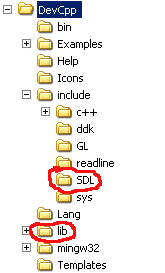
 If you use the SDL 1.2 codebase (QuickCG) provided with the tutorial, unzip it to your code folder (that folder where you store all your DevC++ projects and code in, which is hopefully not in the unreliable My Documents folder of Windows), and just open its *.dev file with Dev-C++, and it should compile and run correctly. To compile it, use "Execute -> Compile" from the menu. The exe file will appear in the same folder as where your code is located. You can run it with "Execute -> Run". You can also compile&run your projects by pressing F9. If it doesn't work, look a bit further for a list of possible solutions. It's highly recommended that you use QuickCG for this tutorial, because the rest of the tutorial focuses on the commands of it and not on the actual SDL itself.
But if you want to make a new SDL project of your own in DevC++ (not needed for this tutorial):
7) Start up DevC++ and make a new project. Add any .cpp and .h files you need to it.
If you use the SDL 1.2 codebase (QuickCG) provided with the tutorial, unzip it to your code folder (that folder where you store all your DevC++ projects and code in, which is hopefully not in the unreliable My Documents folder of Windows), and just open its *.dev file with Dev-C++, and it should compile and run correctly. To compile it, use "Execute -> Compile" from the menu. The exe file will appear in the same folder as where your code is located. You can run it with "Execute -> Run". You can also compile&run your projects by pressing F9. If it doesn't work, look a bit further for a list of possible solutions. It's highly recommended that you use QuickCG for this tutorial, because the rest of the tutorial focuses on the commands of it and not on the actual SDL itself.
But if you want to make a new SDL project of your own in DevC++ (not needed for this tutorial):
7) Start up DevC++ and make a new project. Add any .cpp and .h files you need to it.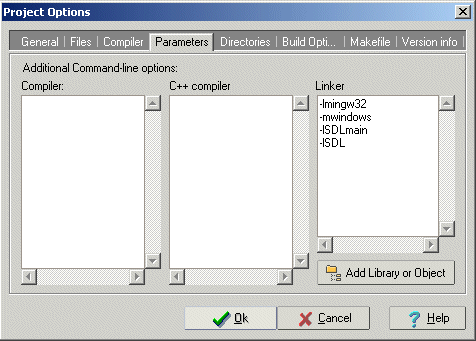
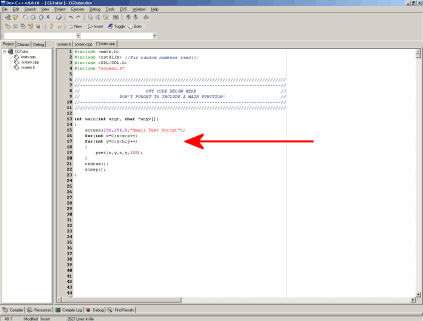
int main(int argc, char *argv[])
|
int main(int argc, char *argv[])
|
int main(int argc, char *argv[])
|
| Variable | Information |
| w | int w; The width of the graphical window, after you used the screen function. In the examples of this tutorial, w is most often used in double for loops that go through every pixel on screen. |
| h | int h; The height of the graphical window, after you used the screen function |
| font | bool
font[256][8][8]; This is the font used for the print function. Even though you can access and change the font variable from within the code, it's never needed to do so. |
| ColorRGB | A simple struct containing 3 integers named r, g and b, with constructors: ColorRGB(Uint8 r, Uint8 g, Uint8 b); ColorRGB(ColorRGB8bit color); ColorRGB(); There are also some predefined RGB colors: static const ColorRGB RGB_Black ( 0, 0, 0); static const ColorRGB RGB_Red (255, 0, 0); static const ColorRGB RGB_Green ( 0, 255, 0); static const ColorRGB RGB_Blue ( 0, 0, 255); static const ColorRGB RGB_Cyan ( 0, 255, 255); static const ColorRGB RGB_Magenta (255, 0, 255); static const ColorRGB RGB_Yellow (255, 255, 0); static const ColorRGB RGB_White (255, 255, 255); static const ColorRGB RGB_Gray (128, 128, 128); static const ColorRGB RGB_Grey (192, 192, 192); static const ColorRGB RGB_Maroon (128, 0, 0); static const ColorRGB RGB_Darkgreen( 0, 128, 0); static const ColorRGB RGB_Navy ( 0, 0, 128); static const ColorRGB RGB_Teal ( 0, 128, 128); static const ColorRGB RGB_Purple (128, 0, 128); static const ColorRGB RGB_Olive (128, 128, 0); The ColorRGB class has also got the operators "+", "-", "*", "/", "==" and "!=" defined so that you can add them, multiply with integers, ... to do color arithmetic more easily. |
| ColorRGB8bit | A simple struct containing 3
Uint8's named r, g and b, with constructors: ColorRGB8bit(Uint8 r, Uint8 g, Uint8 b); ColorRGB8bit(ColorRGB color); ColorRGB8bit(); |
| ColorHSL | A simple struct containing 3
integers named h, s and l, with constructors: ColorHSL(Uint8 h, Uint8 s, Uint8 l); ColorHSL(); |
| ColorHSV | A simple struct containing 3
integers named h, s and v, with constructors: ColorHSV(Uint8 h, Uint8 s, Uint8 v); ColorHSV(); |
| Uint8 | Unsigned 8-bit integer, these are used in the tutorial for color components |
| Sint8 | Signed 8-bit integer |
| Uint16 | Unsigned 16-bit integer |
| Sint16 | Signed 16-bit integer |
| Uint32 | Unsigned 32-bit integer |
| Sint32 | Signed 32-bit integer |
| Uint64 | Unsigned 64-bit integer |
| Sint64 | Signed 64-bit integer |
| Function | Information |
| screen |
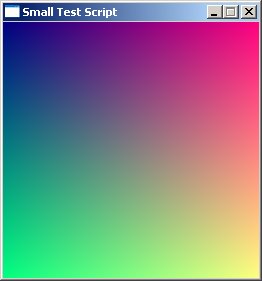
void screen(int width, int height, bool fullscreen, char* text=" "); This is probably the most important function, because it creates the graphical screen but also the whole SDL context. Always call this function at the beginning of your programs, even if you don't need a screen. The integers width and height determinate the resolution of your window. If fullscreen is 0, it'll be a window, if it's 1, the graphics will be drawn fullscreen. text can be used to give a title to the window. For example to create a window of 640*480 pixels with the title "Hello", use: screen(640,480,0,"Hello"); |
| keyDown |
bool keyDown(int key); After using the readKeys() or done() function for the current frame, this function can check for every key whether or not it's pressed. For example, to check if the "a" button is pressed, check if keyDown(SDLK_a) is true. For a full list of all the keys, see the SDL Key table below. |
| keyPressed |
bool keyPressed(int key); The same as keyDown(), but while keyDown will return true as long as the key is pressed, keyPressed will only return true the first time you check, and return true again only if the key has been released and pressed again. So while keyDown would be useful in a game for a key to walk forward, keyPressed can be used for a key that selects a weapon. |
| redraw |
void redraw(); This redraws the screen. If you draw things like pixels, circles and lines, you won't see them before you called redraw(); This function is relatively slow though, so don't use it after every single pixel, but only after you've drawn the whole screen. |
| cls |
void cls(int R = 0, int G = 0, int B = 0); This clears the screen to black again. For example if you're making a bouncing ball program you have to draw a circle at a new position every time, but if you didn't use cls(), the old circles at old positions will still be visible. You can also clear the screen to a certain RGB color. |
| pset |
void pset(int x, int y, ColorRGB color); This function draws a pixel on the screen at position x, y (x has to be between 0 and w-1, y has to be between 0 and h-1), with given RGB color: ColorRGB color has 3 components r, g, b which are values between 0 and 255 |
| pget |
ColorRGB pget(int x, int y); Returns the color value of the pixel at position x, y. This requires reading the color from the memory of the video card, and is quite slow. When you need this function a lot, for example if you're working with transparency or flood fill, it's better to use a buffer to hold the colors, read from this buffer, and draw this buffer to the screen with drawBuffer. |
| drawBuffer | void drawBuffer(Uint32 *buffer); Draws a whole buffer at once to the screen. The buffer has to be exactly the same size as the screen, and is a 2D array. Color values are in 24-bit format in one integer instead of 3 separate 8-bit variables. If it's possible to use a buffer, it can be much faster than drawing each pixel separately. |
| onScreen | bool onScreen(int x, int y); Checks if the point with coordinates x, y is on the screen: inside the rectangle (0, 0) - ((w - 1), (h - 1)). |
| sleep |
void sleep(); When calling this function, the program will pause until you press any key. |
| waitFrame | void waitFrame(double oldTime, double frameDuration); This is made to be handy in cases where you want to limit an effect to a maximum amount of frames per second. The parameter oldTime is the time of the previous frame after calling waitFrame that frame, and frameDuration is the number of seconds per frame (e.g. 0.05 seconds per frame is 20 frames per second). It waits until the minimum time since the previous frame is passed. |
| done |
bool done(); This function returns whether or not you want to close the program, that is, if you press escape, or press the close button of the window. Use this function in a while loop as follows: "while(!done()) {code goes here}". Then the loop will keep running, until you press escape or the close button of the window. |
| end |
void end(); Calling this function immediately ends the program. |
| readKeys |
void readKeys(); This function uses SDL Events to check what keys are pressed, and gives the result to the global inkeys[] variable. |
| getMouseState | void getMouseState(int& mouseX, int& mouseY, bool& LMB, bool& RMB); Stores the position and pressed buttons of the mouse in the given variables (passed by reference) mouseX: the x coordinate of the mouse cursor, mouseY: the y coordinate of the mouse cursor, LMB: true if the left mouse button is pressed, RMB: true if the right mouse button is pressed. |
| getMouseState | void getMouseState(int& mouseX, int& mouseY); Stores the position of the mouse in the given variables (passed by reference) mouseX: the x coordinate of the mouse cursor, mouseY: the y coordinate of the mouse cursor. |
| getTicks |
long getTicks(); This function returns the time since the program started running in milliseconds. |
| max | max(x, y) Returns the maximum of x and y, works with anything: it's defined with preprocessor commands. |
| min | min(x, y) Returns the minimum of x and y, works with anything: it's defined with preprocessor commands. |
| horLine |
bool horLine(int y, int x1, int x2, ColorRGB color); Draw a horizontal line from position x1, y to x2, y with given color. It's a bit faster than using drawLine() if you need a horizontal line. |
| verLine |
bool verLine(int x, int y1, int y2, ColorRGB color); Draw a vertical line from position x1, y to x2, y with given color. It's a bit faster than using drawLine() if you need a vertical line. |
| drawLine |
bool drawLine(int x1, int y1, int x2, int y2, ColorRGB color); Draw a line from x1, y1 to x2, y2 with given color, using the Bresenham line drawing algorithm. Note that all coordinates must lie inside the screen, or the program will crash. You can use clipLine() in combination with drawLine() if you need to draw an arbitrary line, because the line function itself can't draw lines outside the screen and will return 0 it any of the endpoints lies outside the screen. |
| drawCircle |
bool drawCircle(int xc, int yc, int radius, ColorRGB color); Draw a circle with its center at xc,yc, with radius radius, and RGB color red, green, blue. This is an unfilled circle. |
| drawDisk |
bool drawCisk(int xc, int yc, int radius, ColorRGB color); Like circle, but this time it's filled. |
| drawRect |
bool drawRect(int x1, int y1, int x2, int y2, ColorRGB color); Draw a rectangle with corners in x1,y1 and x2, y2, with given color. |
| clipLine |
bool clipLine(int x1, int y1, int x2, int y2, int & x3, int & y3, int & x4, int &
y4); Use this if you need to bring the endpoints of a line you're trying to draw into the screen. Give the function a line with coordinates x1,y1-x2,y2, and it'll return a line with coordinates x3,y3-x4,y4 that are on the edges or inside the screen (that is, inside the rectangle 0,w-0,h). x3,y3,x4 and y4 have to be given to the function by reference, so for example use "clipLine(x1, y1, x2, y2, x3, y3, x4, y4)", where x3, y3, x4 and y4 are normal integers that can be changed by the function, to give the coordinates of the new line to those variables. The function returns 1 if the line is on the screen and 0 if the line isn't on the screen. |
| RGBtoHSL |
ColorHSL RGBtoHSL(ColorRGB colorRGB); Converts a color from the RGB to the HSL color model. |
| HSLtoRGB |
ColorRGB HSLtoRGB(ColorHSL colorHSL); Converts a color from the HSL to the RGB color model. |
| RGBtoHSV |
ColorHSV RGBtoHSV(ColorRGB colorRGB); Converts a color from the RGB to the HSV color model. |
| HSVtoRGB |
ColorRGB HSVtoRGB(ColorHSV colorHSV); Converts a color from the HSV to the RGB color model. |
| RGBtoINT | Uint32 RGBtoINT(ColorRGB colorRGB); Converts a color from RGB to a single integer for the video hardware memory structure |
| INTtoRGB | ColorRGB INTtoRGB(Uint32 colorINT); Converts a color from a single integer to 3 bytes: r, g, and b from the ColorRGB struct. |
| loadImage |
int loadImage(std::vector loads a PNG image (no other image formats supported) with given filename into the std::vector. Also returns the width and height of the image. If there happens a problem during loading, the function returns "1" which means "error". |
| loadImage | int loadImage(std::vector |
|
template<typename T> int print(const T& val, int x = 0, int y = 0, const ColorRGB& color = RGB_White, bool bg = 0, const ColorRGB& color2 = RGB_Black); Draws a text on screen, using the standard IBM ASCII font, made out of 256 characters of 8*8 pixels each. "*text" is the text you want to output, "x" and "y" the location (in pixels) of the top left corner of the first letter, "color" the foreground color, "color2" the background, and bg whether or not the background should be visible: if bg is 0, the background is invisible, if gb is 1, it's fully opaque. The parameter forceLength is the minimum length that should be printed, if the string is shorter, it prints 0 characters behind it (useful if background is enabled and want to draw over a certain fixed length). The return value is h * x + y where x is x position of next letter, y is y position of next letter and h is height of the screen. This return value is useful to find the start location for a possible next print command that should be behind the previous text: x coordinate is then returnvalue / h, y coordinate is returnvalue % h. |
|
| getInputString | void getInputString(std::string& text, const std::string& message = "", bool clear = false, int x = 0, int y = 0, const ColorRGB& color = RGB_White, bool bg = 0, const ColorRGB& color2 = RGB_Black); Prints the message, after the message you can enter a string, which is stored in text. The boolean "clear" determines if the text is still visible after the user pressed enter. |
| getInput | template<typename T> T getInput(const std::string& message = "", bool clear = false, int x = 0, int y = 0, const ColorRGB& color = RGB_White, bool bg = 0, const ColorRGB& color2 = RGB_Black); Convert user input into arbitrary variables. |
| Operator | Information |
| +, -, *, / | Add, Subtract, Multiply and Divide. Some of these are also defined for QuickCG's matrices and vectors |
| % | Modulo Division |
| & | Bitwise AND |
| | | Bitwise OR |
| ^ | Bitwise XOR |
| = | Set equal to |
| Operators for conditions | |
| &&, || | Logical AND and OR (to use in conditions) |
| == | Is it equal? |
| != | Not equal to |
| >,<, >=, <= | Greater than, Smaller than, Greater than or equal to, Smaller than or equal to |
| Function | Information |
| sqrt(x) | The square root of x |
| cos(x), sin(x), tan(x) | Cosine, Sine and Tangent (in radians) |
| acos(x), asin(x), atan(x) | The inverse of Cosine, Sine and Tangent |
| pow(x, y) | The power of one real number to another |
| ln(x) | Natural Logarithm |
| exp(x) | The exponential of a real number |
| int(x), float(x), double(x) | Convert to integer or to floating point number. When dividing two integers through each other, the result will be an integer unless you convert one to a float. |
| floor(x) | Returns the next lowest integer, e.g. 3.1 becomes 3.0. Only works on floating point numbers and doubles. |
| ceil(x) | Returns the next highest integer, e.g. 3.1 becomes 4.0. Only works on floating point numbers and doubles. |
| abs(x), fabs(x) | Returns the absolute value of x. The function abs is for integers, while fabs is for floating point numbers and doubles. |
| Address of a variable |
|
| Creating a pointer to a variable |
|
| Creating an 80 * 90 *100 3D array | float arrayName[80][90][100]; |
| Accessing element 10, 20, 30 from a 80 * 90 * 100 3D array | arrayName[10][20][30] or arrayName[90 * 100 * 10 + 100 * 20 + 30] |
| Passing a variable "by address", so the function can change it |
|
| Passing a variable "by reference", so the function can change it |
|
| Passing a variable by "const reference", so the function can read it without making a copy (which can be inefficient if you're passing a large data structure) |
|
| Passing a 1D array to a function, so the function can read and change it |
|
| Passing a 3D array to a function |
|
| std::vectors | For arrays with dynamic size, std::vectors<Type>, part of the C++ standard, are much more useful. Include the header <vector> to be able to use them. They have functions to resize, get the size, clear, push variables on top, and members can be accessed with [] just like with C-style arrays. Since they're a large datastructure, pass them by (const) reference to functions. |
| SDLKey | ASCII value | Common name |
|---|---|---|
| SDLK_BACKSPACE | '\b' | backspace |
| SDLK_TAB | '\t' | tab |
| SDLK_CLEAR | clear | |
| SDLK_RETURN | '\r' | return |
| SDLK_PAUSE | pause | |
| SDLK_ESCAPE | '^[' | escape |
| SDLK_SPACE | ' ' | space |
| SDLK_EXCLAIM | '!' | exclaim |
| SDLK_QUOTEDBL | '"' | quotedbl |
| SDLK_HASH | '#' | hash |
| SDLK_DOLLAR | '$' | dollar |
| SDLK_AMPERSAND | '&' | ampersand |
| SDLK_QUOTE | ''' | quote |
| SDLK_LEFTPAREN | '(' | left parenthesis |
| SDLK_RIGHTPAREN | ')' | right parenthesis |
| SDLK_ASTERISK | '*' | asterisk |
| SDLK_PLUS | '+' | plus sign |
| SDLK_COMMA | ',' | comma |
| SDLK_MINUS | '-' | minus sign |
| SDLK_PERIOD | '.' | period |
| SDLK_SLASH | '/' | forward slash |
| SDLK_0 | '0' | 0 |
| SDLK_1 | '1' | 1 |
| SDLK_2 | '2' | 2 |
| SDLK_3 | '3' | 3 |
| SDLK_4 | '4' | 4 |
| SDLK_5 | '5' | 5 |
| SDLK_6 | '6' | 6 |
| SDLK_7 | '7' | 7 |
| SDLK_8 | '8' | 8 |
| SDLK_9 | '9' | 9 |
| SDLK_COLON | ':' | colon |
| SDLK_SEMICOLON | ';' | semicolon |
| SDLK_LESS | '<' | less-than sign |
| SDLK_EQUALS | '=' | equals sign |
| SDLK_GREATER | '>' | greater-than sign |
| SDLK_QUESTION | '?' | question mark |
| SDLK_AT | '@' | at |
| SDLK_LEFTBRACKET | '[' | left bracket |
| SDLK_BACKSLASH | '\' | backslash |
| SDLK_RIGHTBRACKET | ']' | right bracket |
| SDLK_CARET | '^' | caret |
| SDLK_UNDERSCORE | '_' | underscore |
| SDLK_BACKQUOTE | '`' | grave |
| SDLK_a | 'a' | a |
| SDLK_b | 'b' | b |
| SDLK_c | 'c' | c |
| SDLK_d | 'd' | d |
| SDLK_e | 'e' | e |
| SDLK_f | 'f' | f |
| SDLK_g | 'g' | g |
| SDLK_h | 'h' | h |
| SDLK_i | 'i' | i |
| SDLK_j | 'j' | j |
| SDLK_k | 'k' | k |
| SDLK_l | 'l' | l |
| SDLK_m | 'm' | m |
| SDLK_n | 'n' | n |
| SDLK_o | 'o' | o |
| SDLK_p | 'p' | p |
| SDLK_q | 'q' | q |
| SDLK_r | 'r' | r |
| SDLK_s | 's' | s |
| SDLK_t | 't' | t |
| SDLK_u | 'u' | u |
| SDLK_v | 'v' | v |
| SDLK_w | 'w' | w |
| SDLK_x | 'x' | x |
| SDLK_y | 'y' | y |
| SDLK_z | 'z' | z |
| SDLK_DELETE | '^?' | delete |
| SDLK_KP0 | keypad 0 | |
| SDLK_KP1 | keypad 1 | |
| SDLK_KP2 | keypad 2 | |
| SDLK_KP3 | keypad 3 | |
| SDLK_KP4 | keypad 4 | |
| SDLK_KP5 | keypad 5 | |
| SDLK_KP6 | keypad 6 | |
| SDLK_KP7 | keypad 7 | |
| SDLK_KP8 | keypad 8 | |
| SDLK_KP9 | keypad 9 | |
| SDLK_KP_PERIOD | '.' | keypad period |
| SDLK_KP_DIVIDE | '/' | keypad divide |
| SDLK_KP_MULTIPLY | '*' | keypad multiply |
| SDLK_KP_MINUS | '-' | keypad minus |
| SDLK_KP_PLUS | '+' | keypad plus |
| SDLK_KP_ENTER | '\r' | keypad enter |
| SDLK_KP_EQUALS | '=' | keypad equals |
| SDLK_UP | up arrow | |
| SDLK_DOWN | down arrow | |
| SDLK_RIGHT | right arrow | |
| SDLK_LEFT | left arrow | |
| SDLK_INSERT | insert | |
| SDLK_HOME | home | |
| SDLK_END | end | |
| SDLK_PAGEUP | page up | |
| SDLK_PAGEDOWN | page down | |
| SDLK_F1 | F1 | |
| SDLK_F2 | F2 | |
| SDLK_F3 | F3 | |
| SDLK_F4 | F4 | |
| SDLK_F5 | F5 | |
| SDLK_F6 | F6 | |
| SDLK_F7 | F7 | |
| SDLK_F8 | F8 | |
| SDLK_F9 | F9 | |
| SDLK_F10 | F10 | |
| SDLK_F11 | F11 | |
| SDLK_F12 | F12 | |
| SDLK_F13 | F13 | |
| SDLK_F14 | F14 | |
| SDLK_F15 | F15 | |
| SDLK_NUMLOCK | numlock | |
| SDLK_CAPSLOCK | capslock | |
| SDLK_SCROLLOCK | scrollock | |
| SDLK_RSHIFT | right shift | |
| SDLK_LSHIFT | left shift | |
| SDLK_RCTRL | right ctrl | |
| SDLK_LCTRL | left ctrl | |
| SDLK_RALT | right alt | |
| SDLK_LALT | left alt | |
| SDLK_RMETA | right meta | |
| SDLK_LMETA | left meta | |
| SDLK_LSUPER | left windows key | |
| SDLK_RSUPER | right windows key | |
| SDLK_MODE | mode shift | |
| SDLK_HELP | help | |
| SDLK_PRINT | print-screen | |
| SDLK_SYSREQ | SysRq | |
| SDLK_BREAK | break | |
| SDLK_MENU | menu | |
| SDLK_POWER | power | |
| SDLK_EURO | euro |
| SDL Modifier | Meaning |
|---|---|
| KMOD_NONE | No modifiers applicable |
| KMOD_NUM | Numlock is down |
| KMOD_CAPS | Capslock is down |
| KMOD_LCTRL | Left Control is down |
| KMOD_RCTRL | Right Control is down |
| KMOD_RSHIFT | Right Shift is down |
| KMOD_LSHIFT | Left Shift is down |
| KMOD_RALT | Right Alt is down |
| KMOD_LALT | Left Alt is down |
| KMOD_CTRL | A Control key is down |
| KMOD_SHIFT | A Shift key is down |
| KMOD_ALT | An Alt key is down |